5 Fun Toddler Art Projects
Hey everybody! We sure hope you are surviving this unprecedented time of quarantine and sheltering at home. Here in Cayman we are in full lockdown, with our borders closed and curfew hours strictly enforced. We are all feeling the effects of being at home all the time, particularly with our little ones! So, in efforts to help you make it through, Aimee has come up with 5 Fun Toddler Art Projects made from things found around the house to keep the kids entertained and engaged, especially for those parents working from home. We hope you find these projects useful and your kiddos find them fun!


5 Fun Toddler Art Projects
1) Block Shape Matching
This is a super quick and easy matching games using things from the kids playroom! Simply take a handful of different shaped blocks/objects and lay them out on a piece of paper. Using a pencil, trace the outline of each shape. I like to then trace over the pencil with sharpie, avoiding getting sharpie on the blocks or toys. While blocks provide the easiest shapes, you can get creative and outline any toy or animal. After everything is outlined on the paper, your child can then match the object their corresponding shape!

2) Color Sorting Boxes
Looking for a more involved activity? This coloring sorting is the perfect floor activity to keep your wee one busy while you try to get some work done. This project does require a bit of prep to put the box together, but I easily did this right after they got to bed and it was ready to play with in the morning. Confession, I did not have a glue gun (left it at the studio before lockdown), which would have made this so much fast to put together, but you can use regular school glue or wood glue (which is what I used). Once the sorting box is all put together, your child can sort out anything you have in color abundance. We have the caps/lids off anything that is headed to the recycling/trash so we have quite a few caps for sorting. You can even use wine corks that you paint (or use marker) with you colors of choice. Even colored cereal works too! Check out the step by step photos below on how to construct your sorting box:

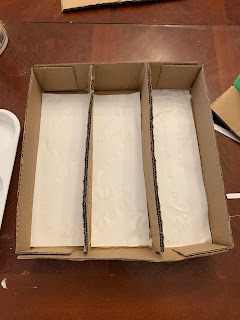
Step 1: Divide a shallow box in thirds by cutting cardboard strips and gluing them in. I used an old formula pallet, but you can use a pizza box, cereal box, amazon box, etc...


Step 2: Line each third column with a piece of white paper by gluing it in. I find this helps the color pop, as opposed to just painting straight on the brown cardboard as I find it dulls the color.


Step 3: Measure the width of each column and cut cardboard squares to fit into thirds going the opposite direction of the current columns. Insert and glue all six squares into the columns until you have nine individual boxes. Wait for glue to dry before handing box; if you are using hot glue you won't have to wait long!

Step 4: Choose which colors you want for each box, this can be based of the color of the objects you are giving your child to sort. We had a lot of green caps, so I made a light green and a dark green box. If you don't have paint, you can use markers, crayons or pencil crayons!
Once the paint is dry it is time to sort! I use an old formula tin to store the colored caps, but you can use anything really. Maybe a Pringles can, tupperware or an old box. This coloring sorting game has kept my 4 year old busy for at least 20 mins at a time, and that allows me to accomplish a lot!
Look at how much fun he is having!
Bonus project: If your child is younger and can't grasp the coloring sorting just yet, you can use the same caps as objects they can put in an old diaper wipes container. This is great for wee ones to learn grasping/pinching of objects and also hand-eye coordination to put items into a slot. Plus, the wipes container doubles as storage for the caps! Your wee one will enjoy filling up the container and dumping back out again!
Bonus project: If your child is younger and can't grasp the coloring sorting just yet, you can use the same caps as objects they can put in an old diaper wipes container. This is great for wee ones to learn grasping/pinching of objects and also hand-eye coordination to put items into a slot. Plus, the wipes container doubles as storage for the caps! Your wee one will enjoy filling up the container and dumping back out again!
3) DIY Finger Paint
If you don't have paint at home and can't get to a craft store, no worries, you can make your own finger paint! This paint recipe only requires four ingredients and you probably already have them in your kitchen. The paints consistency is perfect for finger paint, but can also be used with a paint brush or homemade stamps. These stamps are made from discarded toilet paper rolls (you can cut up paper towel rolls too!). Since this paint is made from washable ingredients, you can also use it outside on concrete or sidewalks; the rain (or hose) can just wash it away. I like to put the paint in a squeeze bottle and let my 4 year old squirt it out to create sidewalk art!

Check out our simple recipe for homemade finger paint below:

4) Painting with Trucks
What child is going to say no to driving their monster trucks through a blob of paint? Guaranteed fun! This art project lasts a good 30 mins in our house, and produces really cool paintings! The texture from the tires is so neat and easy-peasy clean up running the trucks under the tap. If you are more of a tidy mom, you can put a piece paper with globs of paint into a gallon sized zip-loc bag, seal it up and them run the truck over the bag. Mess free and still gets great results!

5) DIY Moon Sand
Zoom zoom to the moon! Not quite, but we can make it pretty close here at home. Moon sand is a staple in our shop on our Toddler Art Days and at toddler birthday parties. It is super simple to make and easy to clean up (bonus!).

The consistency of the moon sand is the prefect texture for packing and making sandcastles. We like to keep our moon sand in a large storage tub because it is easy to store for future uses and also allows for a specific area to encourage the kids to keep the sand in. Also in the box we store little cups and spoons that are great for kids to use with the moon sand. They love digging and filling up the cups with the sand. You can also add in confetti or glitter to give it a bit of flair! In the past we have added confetti and birthday candles when we were celebrating a birthday; just little added fun to the moon sand. You can find our moon sand recipe here:

-I'm confident that these things will keep your little ones busy for at least half a day! More to come in the future as I look through my house to find new an exciting crafts to bring to you and yours. Looking forward to hearing from you on suggestions or questions you might have. Be sure to leave us a comment with your thoughts on this project and maybe more of what you are looking for from us. For more tutorials on ceramic glazing, adult crafts and overall load of fun, check out our you tube channel here: youtube.com/3girlsandakiln
Peace, Love and Art
Facebook: @3girlsandakiln
Instagram: @3girlsandakiln
Etsy Shop: etsy.com/shop/3girlsandakiln

Comments
Post a Comment